- xbSearch Tool
XBSearch allows you to search for features using specific attribute values.
To configure XBSearch:
- Open the project in Development Mode.
- Click the XBUI widget panel.
- Click "Add New Query".
- Choose your data source (e.g., Arizona Biltmore Estates).
- Set the type as Search Query.
- Build an SQL expression:
- Click "SQL Expression Builder" > Add Clause.
- Select the field
- Operator: "is"
- Value: "*"
- Click OK
- Save and publish.
To use XBSearch in the live app:
- Click the magnifying glass icon.
- Enter a value.
- Scroll through results and select the feature.
- The Identify panel will populate with selected feature data.
- Selecting/Filtering Using Query
Queries allow you to select or filter map features based on attribute values.
To create a query:
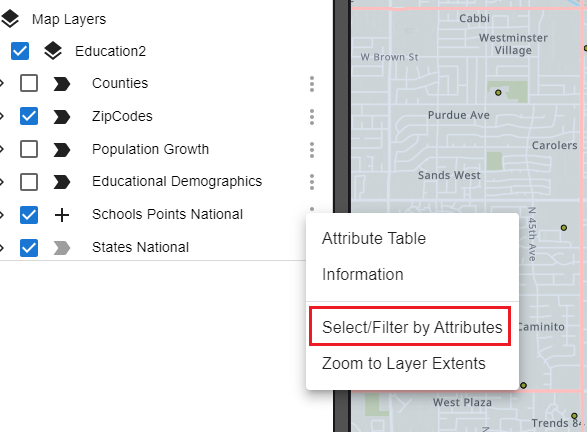
- In the Table of Contents, click the three-dot menu next to the layer you want to filter.
- Select "Select/Filter by Attributes".
- In the Query Builder window, click "Add Clause".
- Select the attribute field.
- Choose an operator.
- Set the value.
- You can add more clauses to refine your query.

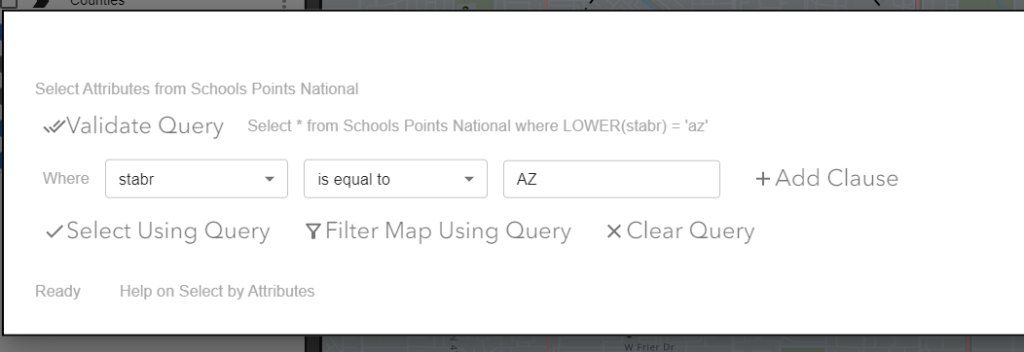
Once the query is complete, choose:
- Select Using Query to populate the Identify panel.
- Filter Map Using Query to hide all other features.
- Editing
To edit a single feature:
- Make a selection using any Selection Mode.
- In the Identify panel, expand the layer.
- Click the pencil icon next to a feature.
- Edit attributes as needed.
- Click the green Save icon.
- A confirmation popup will appear.
For batch editing:
- Select multiple features.
- In the Identify panel, click the pencil icon next to the parent layer.
- Update shared attributes.
- Click Save.
- All selected features will update and reflect changes on the map.
Ensure that your layers are configured as editable in ArcGIS for this to work.
- Creating a Table
To generate a table of selected attributes:
- Use a selection tool to highlight features.
- In the Identify panel, click the three dots next to a layer.
- Choose "Show in Table".
- A floating table will appear.
In the table, you can:
- View and scroll through attributes.
- Rename the tab (three dots > Rename Tab).
- Filter columns ("Columns" tab).
- Apply table filters.
- Adjust density (Compact, Standard, Comfortable).
- Export the table to CSV.
To create a second table:
- Clear your selection.
- Make a new selection.
- Repeat the steps above.
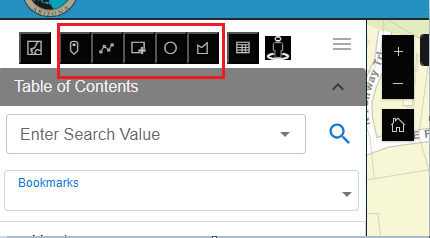
- Using Selection Tools
The XBUI widget includes powerful selection tools available through the Selection Mode Toolbar, found above the Table of Contents.
Available selection modes:
- Point: Click a map point to select intersecting features.
- Line: Click and draw a line to select features it crosses.
- Rectangle: Click and drag a rectangle across features.
- Circle: Click and drag a circle around your selection.
- Polygon: Click to draw a custom shape, then double-click to close.
To use a selection tool:
- Click the appropriate icon from the toolbar.
- Follow the on-screen instructions to draw the selection.
- The Identify panel below will populate with selected features.
Once selected, you can:
View attributes:
- Click on any layer name within the Identify panel to expand it.
- Click on a specific feature within the layer to view its attribute details.
- Attributes will appear in a structured format, showing field names and values.
Zoom or pan to individual features:
- Locate the feature in the Identify panel.
- Click the three-dot menu (•••) next to the feature.
- Select "Zoom to Location" to center and zoom into the feature.
- Alternatively, select "Pan to Location" to center the map on the feature without changing the zoom level.
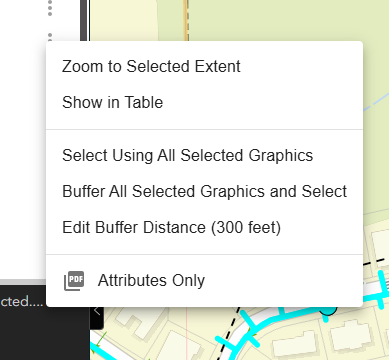
Perform graphic or buffer selections:
- From the Identify panel, click the three-dot menu next to a feature or layer.
- Choose "Select Using Graphic" to use that feature’s geometry (e.g., polygon) to select overlapping features.
- Choose "Buffer and Select Using Graphic" to apply a buffer (default 300 ft) around the feature and select features within that buffer.
- To change the buffer size, select "Edit Buffer" from the menu and input a new value (e.g., 500 ft). Save to apply.